Tuesday, 9 October 2012

How to create page layout with code behind file in visual studio for SharePoint


In my previous post , have shown how to create page layout content type.

Now once again showing how to creating page layout and after creating pagelayout , adding  textbox,buttons and label to pagelayout and also add click events to the buttons, when the user clicks the button a messages will be display in labels.


1. Open Visual Studio 2010 -> Create new Project.

2. Select 'Content Type' Template and specify Project name, Click on 'OK'.

3. Then Specify URL for debugging and select 'Deploy as farm solution' then Click on 'Next'.

4. Select Parent Content Type for the custom page layout i.e 'Page' then Click on Finish.

5. It will automatically Open Elements.xml of Content Type, Change Name of content type if need and add FieldRef with the name of PublishingPageContent'.

6. Here will add New Module to the project.
right click on project--> add new item --> select Module template and give a name.


7.By default module template contain simple.txt file, you can rename simple.txt to pagename.aspx or delete simple.txt and right click on module--> add new item --> select Text file Template and name it as 'Pagename.aspx'.


8. Now open Elements.xml file which is in Module folder,
do the following changes.

a. Add URL to Module tag as Url='_catalogs/masterpage'. This is for deploy the page layout in _catalogs/masterpage path.

b. In File tag's Url attribute should contain .aspx only and add Type attribute as Type="GhostableInLibrary".

c. Now add 3 Property tag under File Tag, Named as ContentType,Title, and PublishingAssociatedCOntentType
<Property Name="ContentType" 
Value="$Resources:cmscore,contenttype_pagelayout_name;"/>
(Here No need to change this tag, simple copy and paste.)
<Property Name="Title" Value="Page Layout Title"/> here change value attribute value.
<Property Name="PublishingAssociatedContentType" Value=";#<Name of the ContentType which is in Elements.xml which is in ContentType folder>;#<ID of ContentType which is in Elememnts.xml of Content Type folder> "/>


9. A really cool capability of page layouts is that you can code them just like any ASP.NET page, including server-side code.  In the same folder as your .ASPX (in the Module folder), add a new class.

Right Click on PageLayout Module folder --> add --> Class.

10. Give proper class name and click on 'OK'.

11. Now add two references to the project
a. System.Web
b. Microsoft.SharePoint.Publishing

12. Add 'Using System.web.UI.WebControls;' namespace.

13. Inherit 'Microsoft.SharePoint.Publishing.PublishingLayoutPage'.

14. and Add public keyword before Class keyword.

15. In this example , am adding one Text box, two buttons and two labels.In first button click event will display current date and time in one label in second button click will display message "hello," along with textbox value in label two.

finally pagename.aspx.cs file will looks like this

16. Now open <pagename>.aspx page which is in module folder and add the following code.

Note: Textbox,button and label variable's name in .cs file and Textbox, button and label tag's ids should be same and OnClick Events containsFunction Names these functions are available in aspx.cs file.

$SharePoint.Project.AssemblyFullName$ that is used, The compiler will automatically replace this with the 4-part name of our assembly.
(The complete code for this solution is attached to the post.)

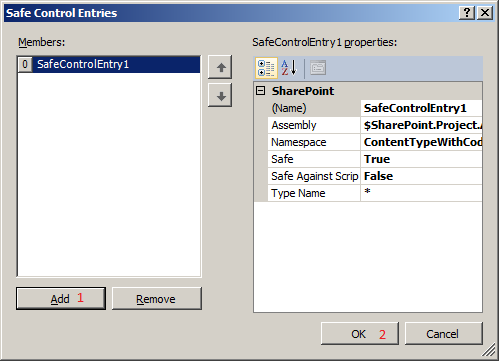
17. Now here going to add safe control.

Click on PageLayout Module and press F4 and Click on Safe Controls Collection, That will bring up a new window that makes it easy to define a new safecontrol entry.


18. Now Click on 'Add' and 'OK' buttons. No need to change any value.

19. The content type will be deployed to the site collection, while the page layout is deployed to the master page gallery in a single web.  Therefore, we need two separate features scoped differently.

Now right click on Features Folder, by default we have one feature,delete default feature and add new feature.

20. Rename newly add feature to 'Site' and Change Title,Description and set Scope to 'Site' and add ContentType to 'Items in the feature'. look at the screen shot.

21. Now add another feature and rename it 'web' and change Title, Description and set Scope to 'Web' and add Page layout module to 'Items in the feature'.


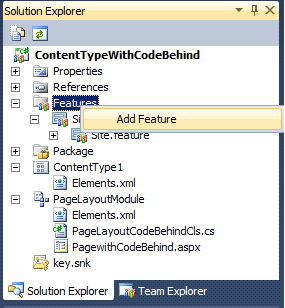
22. Right click on Package and select 'View Designer' then u can see two features which are avail in the package.


23. Now deploy the project.

24. After successfully deployment of the project, you can see the newly added page layout in "_Catalogs/master" path.

go to site --> Site Actions --> Site Setting--> Master pages and page layouts which is under Galleries.

Now u can see newly added pagelayout in list of page layouts.

25. Now we will try to create new page with newly added content type.

Go to create new page(i.e publishing page) specify page name, description and select newly add pagelayout then click on 'Create'.

26. Finaly the page looks like this.

27. Click on 'Get Time' Button it will display current date and time in label.

28. Now enter some text in text box and click on 'Click Me' button, it will display message as "Hello, <textbox text> !!!" in the second label.


Let me know if u have any queries or suggestions. catch me here
Here the complete source code...
Reference: MSDN Blog

Monday, 8 October 2012

Error Type: Error occurred in deployment step 'Add Solution': Cannot start service SPUserCodeV4 on computer ''.


While deploying the solution using visual studio 2010 , got the following error 'Error occurred in deployment step 'Add Solution': Cannot start service SPUserCodeV4 on computer 'UKREDDY'.'

There are two reason for the error. Those are,

1. SharePoint 2010 User Code Host service not started and
2. Microsoft SharePoint Foundation Sandboxed Code Service not started.

Now, we need to solve these two reasons

Step 1:

Open Services.msc in run command and check whether service is started or not  or Disabled?


if not started then start the service then right click on service and select 'Start'.

If The service is disabled then right click on service and select properties.


Now, change service startup type to automatic and click on 'OK'.


Now, right click on service then select Start.
it will takes few seconds time to start the service.


Step 2:

Check Microsoft SharePoint Foundation Sandboxed Code service is started or not.

You can do the following steps to resolve it.

a. Go to Central Administration

b. Open "System Settings"

c. Open "Manage services on server".


d. Locate the service "Microsoft SharePoint Foundation Sandboxed Code service"


e. Start the service  "Microsoft SharePoint Foundation Sandboxed Code service".


Close your application and reopen and now deploy sandbox solution, will deploy successfully. 


Thursday, 4 October 2012

Trick and Tip: How to get list of site collections details in each content databasse in SharePoint using PowerShell


Here another powershell cmdlet to know list of site collections details in each content database using powershell cmdlets

for this i used the following powershell cmdlet

Get-SPContentDatabase | %{Write-Output "ContentDB is - $($_.Name)"{sites are}; foreach($site in $_.sites) {write-Output $site.url}{"-----"}}


and output will look like this


Trick and Tip: How to know associated content databases to each web application in SharePoint using powershell


Here one small cmdlet to know content databases details for each web application in my SharePoint.
For this am going to use the following powershell cmdlet
"Get-SPWebApplication | %{Write-Output "`n- $($_.url)"; foreach($cd in $_.contentdatabases){Write-Output $cd.name}} "
and OutPut is like this

How to create site collection in a Specified or default Content Database using PowerShell


In previous post, created web application using powershell.


Now , creating new site collection using powershell.


Method 1:

Creating new site collection in default content database of the web application.

New-SPSite -Url http://ukreddy:8998/sites/newsitecol2 -OwnerAlias "UKREDDYSYKAM\Administrator" -Name "newsitecollection" -Description "Sitecoll Description" -Template $template


Method 2:


We can create new site collection in a specific content database.

here,Creating new content database and then will create new site collection in newly created content database

a. New-SPContentDatabase -Name "WSS_Content_Developemnt" -WebApplication http://ukreddy:8998

b.

This can not be done from within Central Administration web site.

New-SPSite -Url http://ukreddy:8998/sites/newsitecol2 -OwnerAlias "UKREDDYSYKAM\Administrator" -ContentDatabase WSS_Content_Developemnt  -Name "newsitecollection" -Description "Sitecoll Description" -Template $template

Method 3:

Create new site collection in a specific content database.

a. New-SPSite -Url http://ukreddy:8998/sites/newsitecol2 -OwnerAlias "UKREDDYSYKAM\Administrator" -ContentDatabase WSS_Content_8998 -Name "newsitecollection" -Description "Sitecoll Description" -Template $template

How to create Web Application in SharePoint using poweshell


In previous post , created web application using Server Object Model.

Now , try to create new web application using PowerShell Management.


Method 1:

This method using in-line command.

New-SPWebApplication -Name "UKREDDYSITE" -Port 8888 -URL "http://ukreddy" -ApplicationPool "SharePoint8888" -ApplicationPoolAccount (Get-SPManagedAccount "UKREDDYSYKAM\Administrator") -DatabaseName "WSS_Content_8888" -DatabaseServer "UKREDDY" -AllowAnonymousAccess: $false -AuthenticationMethod "NTLM" -SecureSocketsLayer:$false

Method 2:

This method using Script file.

Copy the following code snippet and paste it in notepad then save it as "<filename>.PS1" 

Then execute the PS1 file in powershell.


$sp_webapp_name = read-host -prompt ‘Web application name:’
$sp_webapp_port = read-host -prompt ‘Web application port:’
$sp_webapp_Url=read-host-prompt 'Web application URL'
$sp_webapp_url =  $sp_webapp_Url
$sp_webapp_apppool = read-host -prompt ‘Web application pool name:’
$sp_webapp_apppoolaccount = read-host -prompt ‘Web application pool account:’
$sp_webapp_databasename = read-host -prompt ‘Web application pool database name:’
$sp_webapp_databaseserver = read-host -prompt ‘Web application database server name:’

#Create a new Web Application
New-SPWebApplication -name $sp_webapp_name -Port $sp_webapp_port  -URL $sp_webapp_url -ApplicationPool $sp_webapp_apppool -ApplicationPoolAccount $sp_webapp_apppoolaccount -DatabaseName $sp_webapp_databasename -DatabaseServer $sp_webapp_databaseserver


Programmatically how to create site collection in SharePoint 2010


In previous post we have seen how to create web application using server object model.


Now here the code snippet to create new site collection using Server Object Model.


Method 1:


in this method , first, once again creating new web application then creating root site collection in that web application. 


try
{
int port = Convert.ToInt32(txtPortNo.Text);

string UserName = txtUN.Text;
string DBName = txtDBName.Text;
string ServerName = txtServerName.Text;
string SiteCollectionTitle = txtSiteCollectionTitle.Text;              
string SiteCollectionDesc = txtSiteColDesc.Text;
string SiteColOwner = txtSiteColOwner.Text;
string SiteColOwnerEmail = txtEmailAddress.Text;
bool isAvail = CheckPortUsage(port);
if (isAvail)
{
SPWebApplicationBuilder builder = new SPWebApplicationBuilder(SPFarm.Local);

SPWebApplication newApplication;
builder.Port = port;
builder.ApplicationPoolId =
"SharePoint - " + port.ToString();

builder.IdentityType = IdentityType.SpecificUser;
SPFarmManagedAccountCollection manaccountcollection = new SPFarmManagedAccountCollection(SPFarm.Local);
SPManagedAccount maccount = manaccountcollection.FindOrCreateAccount(@UserName);
builder.ManagedAccount = maccount; //use the SPManagedAccount to receive the username and password automatically
builder.RootDirectory = new System.IO.DirectoryInfo("C:\\Inetpub\\wwwroot\\wss\\VirtualDirectories\\" + port.ToString());
builder.CreateNewDatabase = true;
builder.DatabaseName = DBName;
builder.DatabaseServer = ServerName;
builder.UseNTLMExclusively =
true;

newApplication = builder.Create(); // Create new web application
newApplication.Name = "SharePoint-" + port;
newApplication.Provision();
SPSite mySiteCollection = newApplication.Sites.Add("/", SiteCollectionTitle, SiteCollectionDesc, 1033, "STS#0", @UserName, SiteColOwner, SiteColOwnerEmail);

mySiteCollection.Close();
MessageBox.Show("Web Application and site collection Created Successfully");

}
else

{
MessageBox.Show("Port Not available");

}
}
catch (Exception ex)

{
label1.Text = ex.Message;
}


public static bool CheckPortUsage(int port)

{

try

{

new TcpClient(new IPEndPoint(IPAddress.Any, port)).Close();

return true;

}

catch

{

return false;

}

}


Method 2:


in this method  we are trying to create a site collection(if u want to create root site collection replace "sites/sitecol3" with "/") in already existing web application.


SPSite site = null;

try
{

SPWebApplication webApplication = null;

webApplication = SPWebApplication.Lookup(new Uri("http://ukreddy:8998"));
site = webApplication.Sites.Add("sites/sitecol3", "anothersitecollection", "sitecolection", 1033, "STS#0", "UKREDDYSYKAM\\administrator", "UKREDDYSYKAM\\administrator", "s.urkeddy@gmail.com");
}

catch (Exception ex)

{

MessageBox.Show(ex.Message);

}

Pls let me know your queries/suggestions ...